How to Install CyanogenMod 7 on the Samsung Galaxy S

Cyanogen is the most famous aftermarket ROM tuner on the planet.  The CyanogenMod series of Android ROMs are widely-used around the world by hundreds of thousands of users.   The Cyanogen team officially supports a wide range of mostly HTC devices.

Although the Samsung Galaxy S phones are currently not on the official Cyanogen list for CM7, crack XDA developers have already been porting the ROM to the SGS.

Most of the custom ROMs available for the Samsung Galaxy S phones are based off of factory firmwares.  This means developers start off with a recent version of a Samsung ROM for a particular model (e.g. i9000.) This means Samsung would have already modified the original Google Android code to begin with as they liked, as well as added stable and working device drivers etc.

CM7 is based on AOSP (Android Open Source Project) Gingerbread code.  This means the Cyanogen team takes the code released from Google and modifies it directly to work on specific phones.  This is no small undertaking, and the polished quality and stability of the final release ROMs from Cyanogen are amazing accomplishments.

Currently CM7 is still in Beta stage.  They are now on version RC2 or Release Candidate #2.  There should be one more RC3 beta before we can expect the final stable release.

Installing CyanogenMod 7 Gingerbread on the Samsung Galaxy S is easy if you follow the step by step instructions.  You will need ClockworkMod Recovery on your phone as well as Odin installed on your computer.  You also need to download the CM7 package for the Galaxy S that contains the zip and tar files to flash.  Then you follow these steps:

1. CWM flash Galaxys-efsbackup.zip

2. ODIN flash cm7-galaxys-initial-kernel.tar

3. format system/data/cache

4. CWM flash cm7-galaxys-initila-xxxxxx.zip

5. wipe

6. reboot

7. CWM flash Google Apps

Then you’ll have an excellent new Gingerbread ROM (already based on 2.3.3.)

Here’s the Video:

Posted in Uncategorized | Tagged , , , , , , , , , , | 2 Comments

How to Unlock a Samsung Galaxy S from Stock Android 2.2 Froyo

The AndroidGalaxy.net ball first stared rolling with a ‘How to Unlock’ video.
My first video uploaded to Youtube in August of 2010 showed how you could download a simple script from XDA to your computer, connect your phone, run the script and it would display a network unlock key. You could use that code to SIM-unlock your phone and use it with other cellphone providers.

That script does not work with Froyo however. Since most Samsung Galaxy S phones around the world now have Froyo (either out of the box or after an official update) I have made a video showing how to sim-unlock a Galaxy S phone that already has stock Android 2.2.

There are 2 apps I found in the market when I searched for Samsung Galaxy S Unlock. I was able to successfully unlock using one of them: Galaxy_S Unlock by Helroz. This app offers 2 methods. The first method is now outdated, as it works similar to the Eclair scripts. The second method replaces a file in a folder called EFS. This is a protected folder however, so in order to run the app, you require root.

Here’s the video:

Posted in Uncategorized | Tagged , , , , , , , , , | Comments Off

How to Flash a Galaxy S Phone back to stock

There are many reasons why you may want to return your Galaxy S to stock form.
You may want to sell it, or return, or send it in for repair. Perhaps you want it in a state where it can receive an official update. Or perhaps you just want to start from square one again, and get it back to the way it was when you first took it out of the box.

Returning a Samsung Galaxy S smartphone to stock configuration is fairly easy. You will need:
1. ODIN
2. A “Full” factory firmware package
3. The firmware package for the stock version you want to flash.

A Full firmware package contains 3 separate files for Odin. A PDA file, which contains the main Android operating system code, a PDA file which is the modem, and a CSC file which contains ‘Carrier Specific Customizations.’

Your starting point does not matter. It does not matter what custom ROM you installed, or what experimental kernel you had flashed. It does not matter what lagfixes you have enabled. It also doesn’t matter if your phone was rooted before or not.

The one thing that does not get affected is if your phone is SIM unlocked. If you unlocked it, flashing factory Samsung firmware via Odin will not re-lock it. If you do need to re-lock your phone that would be a separate task.

Once you have downloaded Odin and the firmware packages you need, the procedure is fairly simple. First flash the full firmware package with Re-partition checked, and the appropriate PIT file selected. After that, if necessary, flash the PDA file of the specific firmware version you want.
Here’s the Video:

Get Odin and find detailed instructions from XDA-developers:
ODIN Download from XDA
Download the Samsung factory firmware you want from www.samfirmware.com

Posted in Uncategorized | Tagged , , , , , , , , | Comments Off

Android Performance Comparisons

It is impressive to see how far Android smartphones have progressed in the last 2 years.

In this video, I compare a couple of Samsung Galaxy S phones (one fully stock, and one Fully modified) along with the very first Android phone ever – the G1, and the newest version of Android, Gingerbread, on an HTC Desire.

Phone Configs in the Video:
G1 : CyanogenMod 6.1 (Froyo 2.2)
Desire: Oxygen RC 7 (Gingerbread 2.3.2)
Galaxy S: Samsung JL2 (Froyo 2.2)
Galaxy S: Darky’s ROM v9.2 (Froyo 2.2.1)

It is important to note that these benchmarking tests should not be taken as gospel. They are good ‘guidelines’ to some general performance measures (like floating point operations, or 3D rendering) and can give an idea of the difference in performance between phones.

The completely unscientific exercise shows that the Galaxy S phones have far better 3D performance than the Desire, but the Desire with Gingerbread has better floating point performance. We can also see that the custom ROM and custom kernal on our upgraded Galaxy S do not give it any additional 3D advantage. We also see what a staggering performance difference there is between an Android phone from 2 years ago versus today’s super fast 1 GHz smartphones!

Just remember though, dual core phones are already on the market, and next year this time we’ll have quad core phones everywhere and we’ll think of the dual core models as SLOW!

Posted in Uncategorized | Tagged , , , , , , , , | Comments Off

Stock Froyo vs Darky’s ROM – Visual Differences

There are many advantages to running a custom ROM on your phone.  You get the satisfaction of having the latest firmware versions from the factory, optimizations for performance, and a ton of theming options.

In this video I highlight some of the Theming and UI visual differences between stock Froyo and Darky’s ROM which uses a lot of elements from Gingerbread 2.3

The icons and darker color schemes from Gingerbread are much better in my opinion.   They are more modern, cleaner looking and much easier on the eyes.   And they look brilliant on a Super AMOLED screen against the black background used in most menus now.  I can tell you from first hand experience, after having Darky’s on my Samsung Galaxy S for a month, when I now look at the stock Froyo touchwiz theme with that blue every where, it looks like a children’s software theme.

And now the video:

Posted in Uncategorized | Comments Off

Darky’s ROM Resurrection Edition – Flash with Odin

I have to hand it to Darky and his crew.  They don’t stop innovating.  I’m fairly sure they were the first to make a ROM Kitchen Mobile App, and now, they have Darky’s Custom ROM available as an Odin flashable version.

If you are starting off with stock Froyo and/or saw my previous post, you know that stock Froyo comes with Recovery 3e, which does not let you flash unsigned zip files.

This means to flash a custom ROM like Darky’s you need to first flash a custom kernal that comes with an a modified recovery application baked right in.

That was the only way, until Darky released the Resurrection Edition.  Now you can flash right over stock using Odin.

My starting point is a 100% stock Samsung Galaxy S i9000M with a fresh JL2 Froyo install.  The process is divided into 2 parts:

1. Flash the Darky PDA file with Odin.

2. Then flash the Darky zip file from ClockworkMod and enjoy.

Here’s the video:

Posted in Uncategorized | Comments Off

How to Add ClockworkMod Recovery to Froyo

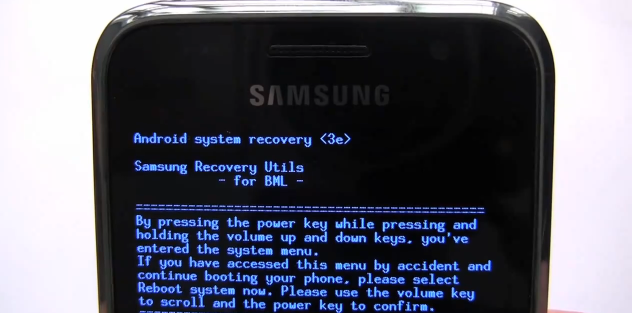
Recovery Menu 3eIf your Samsung Galaxy S already has stock Android 2.2 Froyo, it likely has Recovery 3e.

You can see which version of the Recovery you have on your phone by going into the  Recovery Mode – the version number is listed on the top line.

One significant difference between Froyo’s Recovery 3e, and the previous Recovery 2e that came with 2.1 Eclair, is that 2e lets you flash ‘unsigned’ zip files.  When developers and modders create files that you can download and flash on your phone, those files are  packaged as zip files.  To install on your phone, all you do is download the zip file on to your internal SD card, reboot into Recovery, and click on the file.  These packages are created as unsigned zip files.  This means that you can very easily flash them with Recovery 2e, or a custom recovery like ClockworkMod, but you CANNOT flash them if you have 3e.

This means if you have stock Froyo on your phone, before you get to flash all the great updates that are available, the first thing you need to do is replace Recovery 3e with ClockworkMod.   To do this, you use a Samsung made software tool known as Odin.  Odin is commonly used to flash factory firmware on to your Galaxy S.

Developers are able to bake new advanced kernels that come with ClockworkMod built right in.  So to get CWM on your phone, all you need to do is use Odin to flash a kernel that comes with ClockworkMod.

In this video we use Odin to flash Hardcore’s very popular Speedmod kernel onto an otherwise stock Samsung Galaxy S i9000.

Posted in Uncategorized | Tagged , , , , , , , , | Comments Off

Darkys ROM Version 9.1 Extreme Edition

It doesn’t cease to amaze me what a prolific ROM Developer Darky is.

A GREAT benefit of running a custom ROM on your Samsung Galaxy S is how often updates are released.  If you have a phone with stock firmware, you could consider yourself lucky if you got 2 worthwhile updates in a whole year.  Run a good custom ROM and you are probably going to get updates monthly.

Darky and his crew seem to update weekly.   The first time I flashed a Darky ROM on my phone was on Dec 20th 2010.   At that time it was Version 6.5.  By Jan 29th 2011, the ROM was already at Version 9.1.

Darky’s ROM Version 9.1 Extreme Edition includes the latest Samsung i9000 firmware JS3, which has a build date of Jan 5th 2011.  It also includes your choice of the latest Voodoo and Speedmod kernels.  I especially like how the newest kernel is already baked into new releases.

I flashed Version 9.1 over the weekend.  It is running very smoothly, and so far battery life seems to have been improved further.

P.S.  I realize many loyal readers have been waiting for the video tuturial showing how to upgrade from stock Froyo firmware.  I thank you for your patience.  I had hoped to have that video out in January but got delayed.  I will do my best to have that out by the end of the week.

Here’s the Version 9.1 video:

Posted in Uncategorized | Tagged , , , , , , | Comments Off

Darky’s ROM Version 9 Extreme Edition

Last weekend Darky released his latest release: Version 9.0.2. Extreme Edition.

The big change with this release is the addition of a ROM Kitchen. A ROM Kitchen is another way of saying Configurable ROM Menu.

When the ultra talented Android chefs of the world are cooking up delicious ROMS for us, what exactly are they doing??? Well, they are doing many things, but a few of their activities include, choosing a solid base factory firmware version to start with, then removing unimportant features and software, and then adding good features, theming, kernels etc.

When a ‘ROM Kitchen’ is provided, what that means is that a user like you or me is first given a menu before you start flashing. This can be a simple menu or large menu (up to the chef) where you get to choose things like which keyboards you want included, which launchers, which Samsung software, etc.

With version 9.0, Darky is giving the user that menu via an App on the Android Market. As far as I am aware, Darky is one of the first chefs to hand you the menu this way. This makes it Super easy to choose what you want in your ROM.

I have to also congratulate Darky on how easy he has made it to upgrade. You only download one file, regardless of which options you want, and whether you want to wipe or no wipe. Everyone downloads the same file! How easy is that!

I chose to keep all my settings and apps, and lagfix go down the simplest path. Just flashed the file and that’s all. The upgrade went very smooth, all my settings and apps were retained, and everything continued to work.

I have now been using Version 9.0 for 4 days without problem now. Here’s the video:

Get Darky’s latest ROM from the Darky site:

http://darky.ficeto.com/community/index.php?threads/v9-0-2-final-stable-like-a-revolution.560/

Posted in Uncategorized | Tagged , , , | 1 Comment

Pimp My SGS – Samsung Galaxy S ECLAIR FULL Upgrade Tutorial

I have just added a 5 part video upgrade series.

In this tutorial I take a brand new Galaxy S i9000 out of the box, and unlock it, root it, flash Darky Version 8.0 and enable Voodoo lagfix.  It took less than 3 hours to do all this at a very relaxed pace while filming.

The end result is a very fast phone with a beautiful ROM.  With each newer version, Darky’s ROM seems to get more and more polished.  I have now been using Version 8.0 for 10 days now, and I am really enjoying it.

The phone I just bought came out of the box with stock Eclair.  I have been receiving a lot of queries about how to upgrade to Darky’s ROM from stock Froyo.  I will be covering that in a future video coming soon.

Posted in Uncategorized | 2 Comments